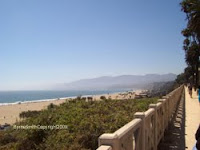
Original Reference Photo

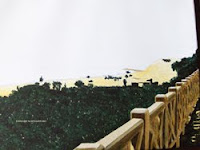
In-Progress Painting I

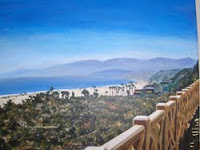
Completed Painting
Today’s Images
Copyright 2009
It’s been a while since I blogged about a "12-Step Acrylic Painting Lesson." The last one was in March, and this will be the third. The subject of this painting just happens to be similar to the last, a view of Santa Monica Bay from the coast in Los Angeles, California.
Today's Images are the original reference photo along with three photos of the painting in progress.
As I mentioned in the first two lessons, the first four steps will probably the same for every lesson because they are the preliminary steps for most paintings.
Beginning with this lesson, I decided not to put a timeframe on the painting because it can vary for every artist according to your skills and how much time you have. I completed this painting in about 15-20 hours spread over five days.
Refer to the Original Reference Photo for Step 1.
Step 1 – Select your motif. I like wide-open beach scenes, and the reference photo is a view from a point off the Pacific Coast Highway in Santa Monica. I cropped the trees from right side of the original photo for better composition. I hope you also have a subject or two that you love to paint.
Step 2 – Select your support; I used a 16 x 20 in (40.6 x 50.8 cm) stretched canvas.
Step 3 – Select your color palette; with the original reference photo in hand, I selected the following:
-for the sky--Liquitex Basics Cerulean Blue, Grumbacher Ultramarine Blue, Winsor & Newton Galeria Titanium White.
-for the haze the water and the mountains --Amsterdam Sky Blue, Van Gogh Warm Grey, Winsor & Newton Galeria Titanium White.
-for the mountains--Liquitex Basics Dioxazine Purple, Liquitex Burnt Umber, Van Gogh Warm Grey, Amsterdam Grayish Blue, and Winsor & Newton Galeria Titanium White;
-for the foreground foliage and trees--Liquitex Viridian Hue, Grumbacher Cadmium Red Medium, Liquitiex Burnt Umber, Amsterdam Yellow Ochre, Amsterdam Naples Yellow, Winsor & Newton Galeria Titanium White (for highlights).
-for the beach--Amsterdam Yellow Ochre, Winsor & Newton Galeria Titanium White
-for the rocks on the beach and buildings--Liquitex Payne’s Gray, Liquitex Burnt Umber; (Liquitex Viridian Hue, Grumbacher Cadmium Red Medium for buildings).
-for the wall and shadow--Van Gogh Warm Gray, Winsor & Newton Galeria Titanium White, Amsterdam Yellow Ochre, Liquitex Burnt Umber, Amsterdam Yellow Ochre, Liquitex Basics Red Oxide; (Liquitex Viridian Hue and Grumbacher Cadmium Red Medium for the shadow).
-for the ocean--Liquitex Basics Cerulean Blue, Grumbacher Ultramarine Blue, Van Gogh Warm Gray, Amsterdam Grayish Blue, Winsor & Newton Galeria Titanium White
Step 4 – Sketch the main elements on your support; the ocean, mountains, beach, and sky were fairly easy to sketch. The foreground foliage and trees took a bit more time because of the detail, and because they take up so much of the canvas. For the wall, you have to be very careful to get the lines, shadows, and facets correct because it’s an architectural element, so you may want to trace it.
Refer to In-Progress Painting I for steps 5 and 6.
Step 5 – There’s no right or wrong order in which to proceed, but since I knew the wall was going to be more time-consuming, I began with that. Paint the darker side of the wall with yellow ochre and burnt umber in the light and dark areas; when complete, use a very light, watery red oxide mix as a wash over the wall —to make it look like reflected light . For the sunny railings and posts, use varying shades of warm gray and white for the sun and shadows. For the deep shadow next to the wall, mix the green and red for a deep, brownish black, leaving yellow ochre for the sun spots.
Step 6—Paint the foliage and trees next. Start with your darker colors first and then highlight the areas with progressively lighter colors to show where the sunlight plays off the leaves. Also use the dark color to paint the mountainside in the mid-distance on the far right.
Refer to In-Progress Painting II for steps 7 and 8.
Step 7—Paint the beach. It’s a relatively small area, so it doesn’t take too long.
Step 8—Paint the mid-distant and distant mountains. The mid-distant mountains should be slightly darker than the distant mountains, but neither are very dark because they are far off. Be careful to paint the mountainsides so that they look like cliffs and slopes with light and shadow; use the warm gray and grayish blue for the lighter areas and the viridian and burnt umber for the darker areas.
Refer to the Completed Painting for steps 9-12.
Step 9—Paint the sky. I used cerulean because the sky is more on the green side rather than on the violet side of blue. Because the haze is so distinct, I suggest starting with the darkest ultramarine blue at the top and work your way down mixing in cerulean in progressively lighter shades. This allows you to judge how light the sky should be when it meets the haze.
Step 10—Now paint the hazy horizon above the water and distant mountains. This is fairly easy, just be careful that it smoothly blends in with both the sky and the mountain ridges; be sure there is no hard line at the ridgetops
Step 11-Paint the ocean. It’s not as blue as you would imagine, so carefully mix the cerulean blue, warm gray, and grayish blue to match the reference photo. The water is a lighter shade the farther away it is, toward the far beach horizon and especially where the water and sky meet on the left; there’s not really a line separating sky and water, it’s more of a vanishing line. Don’t forget to carefully paint the breaking waves white, but not too distinctly.
Step 12—Finally it’s time to paint details of the rocks on the beach and the multi-story buildings on the beach. Don’t put in too many details, and you also want to vary the shades of the buildings slightly because they are not all the same. Also be careful to get the light hitting the rooftops and the shadows correct so the buildings will look realistic.
Now it’s time to step back and enjoy your work of art.
Cheers!

Beautiful and very realistic. If not for the more intense blue of your sky, I wouldn't have been able to tell the difference! In fact, I like your better because it has a more dynamic feel to it compared to the picture.
ReplyDeleteWell, thank you for your nice comments. I hope it's helpful and that you visit often and comment again, too! (Please tell your artist friends about OrbisPlanis.)
ReplyDelete