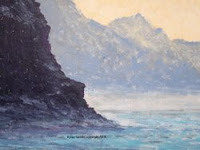
Today’s Image
Misty Blue
Acrylic on Canvas Panel
16 x 20 in (40 x 50 cm)
Copyright 2008
In this edition of Orbisplanis Art Blog I’ll go through the steps I took to paint Today’s Image. It’s an acrylic coastal scene.
I completed this painting in four hours, which does not include varnishing. You do not have to follow these steps in the exact order to have a successful painting. In fact, you should do them in the order that suits you best so that the painting is your own. As Henri Matisse said, “creativity takes courage.” Please do not be either intimidated by that or think that I must be really slow—it takes as long as it takes you—no pressure!
Hour 1
Step no. 1 – Select your motif and style; I like to paint landscapes and coastal scenes, and the color and misty light in this photo caught my eye, so I downloaded it and printed it; I’m learning about how the Impressionists painted so decided to go for that.
Step no. 2 – Select your support; in the last Orbisplanis blog, I discussed how you can re-use canvases by painting over them with gesso, which is what I did on this previously painted 16 x 20 in (40 x 50 cm) canvas panel.
Step no. 3 – Select your color palette; with printed photo in hand I selected the following acrylics from my paint drawer in no particular order (remember--the printed photo may look different than it does on the computer screen)): Van Gogh warm grey, Grumbacher Payne’s gray, Grumbacher ultramarine blue, Grumbacher burnt sienna, Liquitex Basics dioxazine purple, Amsterdam greyish blue, Amsterdam sky blue light, Amsterdam Naples yellow deep, and Winsor & Newton Galeria titanium white.
Step no. 4 – Sketch the main elements on your support; for this painting there are only the few cliffs so I used greyish blue, which I diluted with just a little water, and painted them in loosely with a narrow brush (I prefer Natural Bristle brushes for my acrylics).
Hour 2
Step no. 5 – Paint the sky; I used Naples yellow and titanium white; I wanted to match as close as possible so I daubed the paint on in thick, short diagonal strokes.
Step no. 6 – Paint in the far mountains; I used a mixture of greyish blue and warm grey, which I painted on lightly and let some of the white of the canvas show through to lighten and give the look of distance and atmosphere; I tried to mimic the ups and downs of the peaks to resemble the photo.
Step no. 7 – Paint the mid-range mountains; these are closer to the viewer so they need to be darker than the far mountains; I used the same grayish blue but with more paint and daubed it on again with short diagonal strokes but left less white showing; again I tried to mimic the peaks in the photo.
Step no. 8 – Add dimension to the far and mid-mountain ranges; they may be looking a little flat and two-dimensional at this point, you can add depth and reality by scumbling over them lightly with Naples yellow, which adds the perception of light and shadow; I do this now as it spurs me on because it’s starting to “look pretty good” at this point and I need the encouragement even if it’s my own.
Hour 3
Step no. 9 – Paint the closest mountain cliffs; they are the focal point of the painting so you may want to think about how you’ll paint this before “diving in;” they are the darkest thing in the painting; in my mind’s eye I see a deep purple/deep brown, so I use a mixture dioxizine purple, burnt sienna, and Payne’s gray; it covers a big area so mix up a good blob of paint; paint it on thickly and heavily with multi-directional strokes and leave just a very few spots of canvas showing; leave the edges of the cliffs feathery but enough so they stand out from the mid-mountains.
Step no. 10 – Start on the water; I diluted Payne’ gray with water; loosely and lightly paint in the shadows of the waves starting at the “horizon” (of the water not the shore) and move closer in wave by wave; create depth by making the wave shadows that are more distant using narrow horizontal strokes and increase the thickness as you move closer.
Hour 4
Step no. 11 – Finish the water; this is the trickiest part; I used greyish blue, sky blue light, and titanium white for the water; since the light is coming over the far mountains on the right, the water needed to be lighter and with more highlights on the right side; first I used grayish blue in not-too-thin and not-too-thick horizontal strokes on mostly the left where the water is more in shadow but with a few strokes on the right; then I used sky blue light in relatively thick horizontal strokes—lighter in the distance and getting increasing dark as you move closer in and to the left.
Step no. 12 – Put finishing highlights on the water and near mountain cliffs; using titanium white that is very dry on the brush I scrubbed on the paint where the water meets the distant shore to add the look of misty, hazy distance; I scrubbed on dry greyish blue on the near shore below the dark cliffs to add mist there; finally I scumbled greyish blue lightly over the dark cliffs to add highlights and depth—you can eye-ball this so that the highlight add the depth that looks in keeping with the rest of the painting.
We're finished, and I like it.
Cheers!

No comments:
Post a Comment