Monday, August 31

Yet Another 12-Step Acrylic Painting Lesson from OrbisPlanis


Original Reference Photo
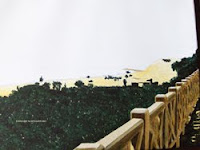

In-Progress Painting I

In-Progress Painting II


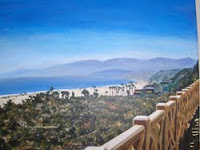
Completed Painting

Today’s Images
Copyright 2009

It’s been a while since I blogged about a "12-Step Acrylic Painting Lesson." The last one was in March, and this will be the third. The subject of this painting just happens to be similar to the last, a view of Santa Monica Bay from the coast in Los Angeles, California.

Today's Images are the original reference photo along with three photos of the painting in progress.

As I mentioned in the first two lessons, the first four steps will probably the same for every lesson because they are the preliminary steps for most paintings.

Beginning with this lesson, I decided not to put a timeframe on the painting because it can vary for every artist according to your skills and how much time you have. I completed this painting in about 15-20 hours spread over five days.

Refer to the Original Reference Photo for Step 1.

Step 1 – Select your motif. I like wide-open beach scenes, and the reference photo is a view from a point off the Pacific Coast Highway in Santa Monica. I cropped the trees from right side of the original photo for better composition. I hope you also have a subject or two that you love to paint.

Step 2 – Select your support; I used a 16 x 20 in (40.6 x 50.8 cm) stretched canvas.

Step 3 – Select your color palette; with the original reference photo in hand, I selected the following:

-for the sky--Liquitex Basics Cerulean Blue, Grumbacher Ultramarine Blue, Winsor & Newton Galeria Titanium White.

-for the haze the water and the mountains --Amsterdam Sky Blue, Van Gogh Warm Grey, Winsor & Newton Galeria Titanium White.

-for the mountains--Liquitex Basics Dioxazine Purple, Liquitex Burnt Umber, Van Gogh Warm Grey, Amsterdam Grayish Blue, and Winsor & Newton Galeria Titanium White;

-for the foreground foliage and trees--Liquitex Viridian Hue, Grumbacher Cadmium Red Medium, Liquitiex Burnt Umber, Amsterdam Yellow Ochre, Amsterdam Naples Yellow, Winsor & Newton Galeria Titanium White (for highlights).

-for the beach--Amsterdam Yellow Ochre, Winsor & Newton Galeria Titanium White

-for the rocks on the beach and buildings--Liquitex Payne’s Gray, Liquitex Burnt Umber; (Liquitex Viridian Hue, Grumbacher Cadmium Red Medium for buildings).

-for the wall and shadow--Van Gogh Warm Gray, Winsor & Newton Galeria Titanium White, Amsterdam Yellow Ochre, Liquitex Burnt Umber, Amsterdam Yellow Ochre, Liquitex Basics Red Oxide; (Liquitex Viridian Hue and Grumbacher Cadmium Red Medium for the shadow).

-for the ocean--Liquitex Basics Cerulean Blue, Grumbacher Ultramarine Blue, Van Gogh Warm Gray, Amsterdam Grayish Blue, Winsor & Newton Galeria Titanium White

Step 4 – Sketch the main elements on your support; the ocean, mountains, beach, and sky were fairly easy to sketch. The foreground foliage and trees took a bit more time because of the detail, and because they take up so much of the canvas. For the wall, you have to be very careful to get the lines, shadows, and facets correct because it’s an architectural element, so you may want to trace it.

Refer to In-Progress Painting I for steps 5 and 6.

Step 5 – There’s no right or wrong order in which to proceed, but since I knew the wall was going to be more time-consuming, I began with that. Paint the darker side of the wall with yellow ochre and burnt umber in the light and dark areas; when complete, use a very light, watery red oxide mix as a wash over the wall —to make it look like reflected light . For the sunny railings and posts, use varying shades of warm gray and white for the sun and shadows. For the deep shadow next to the wall, mix the green and red for a deep, brownish black, leaving yellow ochre for the sun spots.

Step 6—Paint the foliage and trees next. Start with your darker colors first and then highlight the areas with progressively lighter colors to show where the sunlight plays off the leaves. Also use the dark color to paint the mountainside in the mid-distance on the far right.

Refer to In-Progress Painting II for steps 7 and 8.

Step 7—Paint the beach. It’s a relatively small area, so it doesn’t take too long.

Step 8—Paint the mid-distant and distant mountains. The mid-distant mountains should be slightly darker than the distant mountains, but neither are very dark because they are far off. Be careful to paint the mountainsides so that they look like cliffs and slopes with light and shadow; use the warm gray and grayish blue for the lighter areas and the viridian and burnt umber for the darker areas.

Refer to the Completed Painting for steps 9-12.

Step 9—Paint the sky. I used cerulean because the sky is more on the green side rather than on the violet side of blue. Because the haze is so distinct, I suggest starting with the darkest ultramarine blue at the top and work your way down mixing in cerulean in progressively lighter shades. This allows you to judge how light the sky should be when it meets the haze.

Step 10—Now paint the hazy horizon above the water and distant mountains. This is fairly easy, just be careful that it smoothly blends in with both the sky and the mountain ridges; be sure there is no hard line at the ridgetops

Step 11-Paint the ocean. It’s not as blue as you would imagine, so carefully mix the cerulean blue, warm gray, and grayish blue to match the reference photo. The water is a lighter shade the farther away it is, toward the far beach horizon and especially where the water and sky meet on the left; there’s not really a line separating sky and water, it’s more of a vanishing line. Don’t forget to carefully paint the breaking waves white, but not too distinctly.

Step 12—Finally it’s time to paint details of the rocks on the beach and the multi-story buildings on the beach. Don’t put in too many details, and you also want to vary the shades of the buildings slightly because they are not all the same. Also be careful to get the light hitting the rooftops and the shadows correct so the buildings will look realistic.

Now it’s time to step back and enjoy your work of art.

Cheers!

Thursday, August 27

Six Observations on Being an "Artist"


Today’s Image
Icon for "Artist"
Courtesy of Microsoft

During everyone’s life there is ebb and flow, ups and downs--what we used to call bio-rhythm a long time ago. Artists are as likely to experience these times as much as anyone, perhaps even more so for whatever reason. It could be a creative thing or whatever, sunspots, maybe?

Today’s blog is a reality check about being an “artist.”

It’s going on two years now since I re-discovered art as an interest in my life. Looking back, I notice I have had, and continue to have, ups and downs, fits and starts. At times I’m looking for new directions while still trying to figure out what it is that I’m actually doing. (Sound familiar? Read on…)

Bad news—I still don’t know.

Good news—I think I’m getting closer (maybe) and want to share a few observations.

Observation 1

You have to understand where you’re at. I know that’s not grammatically correct, but it’s, nevertheless, true. If you don’t know where you and your art are, you can’t figure out where to go, so you just hang there, wherever that is, twisting, so to speak. I don’t think it’s a good place to be although some artists relish it.

Observation 2

Following on to Observation 1, there should be a there, there. I’m referring to the old joke about Philadelphia--“there is no there, there.” My apologies to the city of brotherly love, but you must be or get grounded in your abilities and aspirations somehow. This is also referred to as being comfortable in your own skin, art “skin,” that is. As Popeye says, “I am what I am.” (If you don’t know who Popeye is, Google him.)

Observation 3

You must have this conversation with yourself and ask, “why am I doing this (creating art)?” Most of us will not be honest—even with ourselves. Imagine that. It really doesn’t matter what the answer is, the important thing is that you admit why you are really doing this. Really.

If it’s to become famous, say so. If it’s to have your work hang in a gallery, say so. If it’s to make money, somehow, admit it. If it’s because you are guided by an “unknown force,” realize it. But for your own sake, you must answer this question truthfully. The rest of your art life depends on it.

Observation 4

Perseverance is the no. 1, key, over-arching, most important, big, enormous attribute of being an artist. This doesn’t mean perseverance trumps the truth of Observation 3, but this means you won’t make any progress without it. You cannot focus on anything else. Art, art, and art some more.

Observation 5

You only have to please yourself. Learn this lesson and your art life will suddenly, fantastically take on a whole new vibrant creative break-through.

Observation 6

The moment of truth. In my readings about the well known and the not so well known artists throughout art history, I found one thing they all had in common: their only goal was to create art.

If it’s not your one and only goal, then you are not an artist.

Cheers!

Monday, August 24

The Joy of Painting With Acrylics


Today’s Image
View From Los Alamos
Copyright 2008

Today's Image
is a small postcard-size acrylic I painted last year.

After months of doing nothing but watercolor paintings, I’m working on an acrylic. It’s the first time I hauled out my two drawers of acrylic paints since February, at least. Not that I’m quitting watercolor, but I was afraid I would forget how to paint with acrylics. A couple of weeks ago I was wasting time and tried painting with acrylic on a scrap of watercolor paper.

It’s a good thing I did. I was surprised at how different it felt to use acrylic paint after seven months. Like anything else, if you don’t use it, you lose it.

With watercolor, you paint from light to dark; that is, anything white will get no paint, and then you paint the lightest objects first, such as light yellows followed by darker yellows, etc. This means you have to plan out everything you’re going to paint in what I think is laborious detail beforehand. If you don’t, you quickly learn that you can’t paint light blue over dark blue and still see it.

Whew—that’s work, at least for an acrylic painter. When I tried acrylics again, I was still trying to use the watercolor rules, being all tedious, and thinking about in what order I should paint. Then I remembered I don’t have to do that.

That’s when I said almost out loud, “that’s what’s so great about acrylics!” I had forgotten the freedom you have with acrylics. You can paint anything you want anyway you want it, and if it doesn’t work for you, you can paint over it—again and again and again and again if need be.

With watercolor you’re encouraged to use a limited palette of the three primaries—for harmony, you’re told as if it were almost a religion--as if there were some cosmic purity in using the fewest number of colors. Supposedly it's because the transparent quality of watercolor doesn’t lend itself to a lot of color mixing before it gets muddy. Watercolorists tell you that being able to see the colors through the transparent layers is nirvana. Really?

With acrylics you CAN use just the three primaries if you like, but unless you thin down the acrylic so that it’s like watercolor (which you can do), you don’t have to limit your palette. With so many acrylic colors available, you don’t have to “mix your own.” Oh, the palettes you can use.

Yes, yes, I know, acrylics dry in the blink of an eye, and it can get frustrating. A spray bottle of water is your best friend, and some of the new “open” acrylics paints dry more slowly, which makes them even easier to use.

No, they’re not oils either. I can almost hear oil painters saying oil is the only real way to paint. I have painted with oil paint, and it is a fine medium, but it’s not the only medium either. It carries an odor, even the “odorless” paint thinner, and it takes for--ev--er to dry.

I haven’t tried encaustic. Maybe painting with wax is the way to go, but I haven’t used it yet. That’s what I like about art, always something new to try.

So, I’ve been working on an acrylic this last week. I’ll finish it in a few days. It’s been a lot of fun to paint with acrylics again. But after that I’ll go back and do a watercolor, and then maybe another acrylic, and then another watercolor. We’ll see. But an oil painting—I don’t think so.

Cheers!

Thursday, August 20

What is Fauves and Fauvism?


I’m currently reading a biography about Diego Rivera about which I’ll blog at some future date. About one-third of the way through, in a chapter covering Rivera's early art days in Paris, there is mention of the Fauves with an appending asterisk.

At the bottom of the page the asterisk refers to a statement, which mentions a group of painters showing their paintings of exceptionally bright colors that were exhibited at the Salon d’automne in 1905. It also said fauve meant wild beast. I think that is interesting.

Now, I had seen the term Fauvism in my art readings, but not being an art history major (at all), it was one of those non-English art terms that I filed somewhere in the back of my brain under Will Research That One of These Days.

Yesterday was One of These Days. I added Fauvism to the section of the blog over there in the right-hand column I call Artist "Factoids." It’s where I put art terms with which I’m not that familiar, so that I may learn them. My hope is that others find this useful, too. By the way, researching the terms is relatively easy; writing a brief sentence or two that defines each term is more difficult.

Anyway, I added Fauvism. Here's what I said:“a post-Impressionist art movement by a group of painters in Paris around 1905 that emphasized modernism and exceptionally bright colors; from the French word 'fauve,' which means wild beast.”

Henri Matisse, whom I like to quote, was the leader of Les Fauves (the Wild Beasts), which the painters in the movement were called.

Why were they called that? Well, according to the National Gallery of Art website (and I’m paraphrasing), when Matisse and some of his contemporaries wanted to exhibit their latest paintings with bold colors and emphatic brushstrokes at the Salon d’automne, they were first warned not to. Critics described their work as primitive, brutal, and violent, with one calling them Les Fauves, a name which stuck. Relenting, the Salon hung their works together in Room 7, also known as la cage (the cage). Clever.

Others painters recognized as being in Les Fauves are Georges Braque, Andre Derain, Raoul Dufy, Henri Manguin, Franz Marc, Kees Van Dongen, and Maurice d’Vlaminck. (If I've left anyone out, my apologies to their descendants.)

One site described the colors used as bold, vivid, and pure. I like that description, not only to describe the Fauve colors, but also to describe beautiful colors in paintings and art in general.

Fauvism is usually referred to as a movement. You never hear Impressionism called a movement, rather it’s the Impressionist era, so I'm guessing a movement must be a shorter period of time. In fact, the Fauvism movement was short-lived; the paintings described as Fauvism were painted generally between 1904 and 1908.

Little known fact: the Fauves are also an Australian rock band. Who would have thought?

Cheers!

Monday, August 17

Four Stages of Painting a Picture


Baltimore Harbor
Acrylic on Paper
20 x 16 in/50.8 x 40.6 cm
Copyright Byrne Smith 2009
While working on several recent paintings, I noticed I go through several stages throughout the process (or is that ordeal?). The stages you go through while you’re painting are not totally unlike the stages of grief—shock, denial, acceptance, recovery—although hopefully not as sad. 

I pinpointed the four stages I go through, although I had a tough time in coming up with names for each stage. To lighten things up, I decided to go with the metaphor of children’s stories to describe each of the four stages of painting a picture.

Here we go:

Stage 1 – The “When You Wish Upon A Star” Stage
This is the light and airy phase when you’ve selected the perfect motif and can’t wait to get going. Anything is possible, and your artwork is going to be the best ever. Art critics will sit up and take notice, for sure!

Nothing can stop you from delivering your best work. In your head, you envision your work bathed in the bright lights of acclaim and glory. In your heart you know you have everything it takes to become a great, or at least an acknowledged, artist.

I also call this the “Monet” phase because I always think my work will somehow look like one of Monet’s beautiful, shimmering masterpieces and become recognized as his were.

Hey, I can dream and make that wish at this stage.

Stage 2 – The “Little Engine That Could” Stage

At this point, some reality has set in, and you can see that you’re in it for the long haul. You’ve got the major elements blocked in, so far so good, but you begin to notice the more difficult items that will take all of your attention in the very near future.

You have to tell yourself that you really are up to this task, “I think I can, I think I can…”

This is the time when you have to climb that hill and keep going and going.

Stage 3 – The “Ugly Duckling” Stage

I think this is the hardest and the most surprising phase, because it creeps up on you so unexpectedly, at least when you’re an inexperienced artist.

You’re probably more than half-way finished with the painting, and you tell yourself, “Okay, this is progressing just fine.” Then, for some reason you step back to get some perspective and a good look, and OMG! What is this mess I’m creating?

Nothing looks right. The colors are not harmonious and the contrast is all wrong and it’s just all out of whack. This is when you have to get a grip, just get a grip on the whole situation. You need to realize this is normal, really it is.

Perseverance is the key. You’re hitting the wall, but you have to go through it. And so you do.

Stage 4 – The “Cinderella” Stage

In this final stage, things become resolved, and the pieces fall into perfect place. Your work has transformed from a poor, unremarkable piece into a beautiful work of art that everyone admires. Just when you think it’s all for naught, your aspirations are realized.

And they all lived happily ever after…

Cheers!

Thursday, August 13

Tips for Cropping and Enlarging Digital Reference Photos


Today’s Image
Digital Camera Icon
Courtesy of Microsoft Corp.

Today’s art blog is about some of the practical aspects of working with reference photos. It’s a follow-on to a blog I did, “How I Paint from a Reference Photo,” and you may want to refer to it.

I use reference photos because I rarely ever paint en plein air. As much as I would like to have lived in the leafy Paris suburbs in 1888 with the Impressionists, I don’t. If you live in a major metropolitan city of the world, which many of us do, then you know it’s difficult to paint en plein air much of the time.

For that reason, and others, such as we live in the digital age, I paint from reference photos. For this blog, I am assuming (oh, dear) that you use a personal computer and printer, that you take photos with a digital camera, that you have access to Adobe Photoshop or Photoshop Elements, and that you live near a Kinko’s, Office Depot, Office Max, Staples, or the equivalent office supply retailer in your area. If not, so sorry.

I’m going to give three points to keep in mind about using reference photos.

Crop for composition.

You can use the reference photo as it is, of course, but cropping allows you to, among other things, improve the composition, emphasize the focal point , and remove unwanted objects from the scene.

Using reference photos does not mean you can forget your artistic training and/or senses. If anything, you need to heighten your artistic senses while cropping. This is where you will use your sense of balance, design, and what makes a great painting to improve the static photo image. In Photoshop Elements, you use the crop tool to do this. It’s easy.

Crop the photo and support in the same proportion (this is important).

This means their lengths and widths are compatible with each other. If not, everything in the photo may not fit. For example, if your digital photo is 4 x 5.25in (10.2 x 13.3cm), which is a standard DIGITAL size for prints, and your support is 24 x 30in (61 x76.2cm), then they are not in the same proportion, but close. The proportion of the photo is 4:5.25 and the proportion of the support is 4:5.

You could crop .25in (0.6cm) from one end of the photo, so that it becomes 4 x 5in (10.2 x 12.7cm), but doing this could ruin your composition depending on the photo.

What you want to do is to crop in the same proportion, 4:5, corner to corner. This is easy in Elements, just make sure the ‘ruler’ is turned on. Now all you have to do is print out your new cropped photo with the changes you’ve made.

Enlarge your photo.

Now you need to figure out the percentage to enlarge your photo so that it’s close to the same size as your support. Most of the time it won’t be exact, but if you're close, within 1in (2.5cm), then it’s easy enough to fill your painting around the edges.

Most color copiers have a maximum paper size of 11 x 17in (27.9 x 43.2cm). If any one side of your support is larger than 17 in (43.2cm), then you’ll have to enlarge the photo in at least two steps. That is, enlarge it, then cut enlargement in half, and then enlarge each half again.

This is not as bad as it sounds. Work with me here.

Since you’ve cropped your photo to 4 x 5in (10.2 x 12.7cm), your first enlargement is 250 percent. This results in an image of 10 x 13.125in (25.4 x 33.3cm), which will fit on a 11 x 17in (27.9 x 43.2 cm) sheet.

Now use the paper cutter to remove all the white borders. Then cut the image in half on the 13.125-in (33.3-cm) side. Each half will be 10 x 6.56in (25.4 x 16.7cm).

Next, enlarge each half 225 percent. The result will be two halves of 22.5 x 14.7in (57.2 x 37.3cm) each.

All that’s left to do is tape the two halves together, which will give you an image of 22.5 x 29.5in (57.2 x 74.9cm). That will easily fit a standard 24 x 30in canvas with just a little tweaking at the edges.

Voila, you have a full-size reference photo from which to paint your masterpiece!

Cheers!

Monday, August 10

Overcome the Blank Canvas


Life is funny, even for artists, don’t you think? I’m talking about the small coincidences and oddities that weave themselves into, around, and out of everyday life. Most days, I have no notion of what art-y subject I may blog about until I sit down at the laptop keyboard. Today when I sat down at my keyboard, I had no ideas in my head; nothing was sticking.

To get my mind off of it, I logged into my Twitter account. If you don’t know of what I speak, you must have recently been off the planet. Anyway, I was reading the latest tweets from the 190 people (mostly artists of some kind) I’m following. The tweets scroll endlessly as they are posted.

One caught my eye. It read: “It’s so fine and yet so terrible to stand in front of a blank canvas.” – Paul Cezanne. I won’t mention the name of the person I follow, but thanks! Your tweet provided the idea for Today’s Image and art blog, which is about overcoming fear of a blank canvas.

Do you remember this old magazine ad from a long, long time ago? Or maybe you are or were in the advertising industry, it goes: “They laughed when I sat down, but when I started to play…” The ad was about a guy who surprised everyone in the room because he secretly learned to play the piano like Beethoven, and nobody knew. (I guess it sold a lot of pianos.)

Change it up for artists, and you get, “They laughed when I stood at the blank canvas, but when I started to paint…” I am saying the act of painting takes fortitude.

Maybe it’s anxiety. Some artists are most private. Their work is their own creation, and they really don’t want to expose themselves in such a manner. We should respect that. However, you must overcome the canvas and get started.

If you're afraid of getting hurt by what someone may say, don't be. That can hold a lot of artists back but don't let it. Think of criticism as just another way of learning.

Standing before a blank canvas and feeling so fine and so terrible all at the same time is amazing. It’s pleasure and pain. To me, the act of painting is a personal expression of what I want others to see through my eyes. It’s very selfish if you think about it like that, and powerful.

Many artists probably don’t think of it as power, but it is. You are in control. You provide the viewpoint. Getting back to that blank canvas, it’s your world within the confines of the four edges of the canvas. You can make it whatever you want it to be. You set the mood, you create the subject, and you hope you leave the viewer changed or at least with something to ponder.

Life is nothing but a continuing series of choices that you make. So paint that picture for the world see. You have something to say as an artist even if you haven’t figured out what that is yet. It is important.

As Henri Matisse said, and as I’ve mentioned previously in the blog, creativity takes courage. Overcome the blank canvas and fear not.

Cheers!

Thursday, August 6

Add Volume and Expression to Your Painting - Weight, Modeling, Thickness, and Contrast


Today’s Image
From the Deck of the Ocean Liner
Watercolor on Paper
18 x 15 in (45.7 x 38 cm)
Copyright 2009

“It needs more volume,” the artist kept telling me. “More volume!”

Maybe it’s the linguistic difference between eastern and western cultures, I thought, although I was pretty sure “volume” was a universal art concept. I just wasn’t getting it. It was the second week I was being told, “it needs more volume,” and I was afraid of looking totally ignorant.

I asked innocently, “what do you mean?” To me, my painting looked pretty good. There were light and shadows in the motif, and I thought it looked pretty good.

Somewhat exasperated, she walked over to my painting and with her accusing finger pointed—here, here, and here, “More volume. It’s flat.”

“Oh, Okay,” I said, still not exactly sure what she meant, but finally something a little more concrete that I could go on, at least. Maybe.

During the week I thought I’d better figure this out. I first did Google research, but, you know, sometimes that just won’t cut it. It sent me off on tangents and mostly gave me references to volume numbers of a book, such as Drawing, Volume I.

So, I looked in my ‘art library’ that I’ve mentioned before in this blog—not vast, but it has the basics. Well, maybe not all the basics, but I did find three references that, I think, gave me the answer.

I have referenced all three of these books in previous blogs on different art subjects, and I keep coming back to them, so I must think they’re helpful.

First, in Kimon Nicolaides’ classic, The Natural Way to Draw, he may have used different terminology to describe volume. He uses the terms weight and modeling, but I’m pretty sure he’s talking about volume. He does, however, say weight, is more than just volume and gives an example of a paper cup and a silver cup as having the same volume, but the silver one has more weight, of course. He says weight (and form) are dependent on the three dimensions, length, width, and thickness. Thickness. I think that’s part of it.

Nicolaides adds more understanding in a section on modeling, which is the physical act of drawing weight, volume, and/or thickness. While modeling the subject, he says. “press hard where the form goes back--press more lightly where it comes toward you.” So, it also has to do with light and shadow. Thank you, Kimon.

In a Barron’s book titled Light and Color by Parramon’s Editorial Team, the term volume never appears, but I gleaned some meaning in their discussion of contrast. It says basically that in the laws of nature, light defines the images we see, and the artistic image we interpret must also follow these laws, which they sum up as contrast. They may somewhat oversimplify it by saying that without contrast there's no perception or expression. So, I’m understanding that what the artist was telling me is that without volume or contrast, my painting lacked expression. Okay.

Finally, in Betty Edwards’ book, Drawing on the Right Side of the Brain, which I also referred to in my last blog, which was on observation, she simply says volume is the three-dimensional thickness you see on the (focal) plane.

Today’s Image is my watercolor painting about which I was twice told “needs more volume.” The funnels on the ship were lacking the needed volume, and which I was finally able to add.

Alrighty now! I think I’ve got it, and I hope you do, too.

Cheers!

Monday, August 3

Learn to See - Improve Your Art Through Observation


Today’ Image
See the Forest for the Trees
Photo Courtesy of Microsoft

Today’s Image represents the topic of today’s blog—observing the details to improve your art. A year or so ago I spent a couple of blogs talking about drawing, learning to draw, and referenced some of the work of Betty Edwards. In her book, Drawing on the Right Side of the Brain, she discusses, among other things, how one must first learn to see before one can learn to draw. That got me to thinking about observation and how it has the power to change your artwork.

Think about that for a minute.

Observing, seeing—call it what you like—is not just any habit you and your body fall into. If you have some level of eyesight, you have the ability to see. However, I’m not talking about the physiological ability to see; I’ll leave that to the opthamologists, who, I’m sure, will applaud that.

I’m talking about actually seeing and observing—not simply looking, viewing or watching. “What’s the difference?” you ask.

Well, it’s the difference between walking and traveling, between talking and conversing, and between writing and communicating--do you understand what that means?

If you are, or even think you are, in an art “rut,” and I sincerely hope that is not the case, perhaps one way to get out of that “rut” is by the power of observation.

It means learning or re-learning to take time to observe the details of everyday life. That is easy to say (or write) and difficult to practice consistently because of the pace of life in the 21st century. I’m certainly guilty of it. You can even ‘follow me on Twitter’ it says over there in the right-hand column of the blog. Need I say more about the pace of life?

As artists, however, we simply must take or make the time for observation. Our artistic life depends on it, much the same way a musician depends on his ears and the ability to hear. I can’t say (or write) it any more plainly.

I go for walks as much for the mental rewards as for the physical. It’s when I do some of my best thinking and observing. It doesn’t have to be a walk or even anything physical, but you must allow time for your mind and your eyes to wander and observe in detail what’s going on around you every day. It doesn’t have to be outdoors, but there’s so much going on out there in nature.

Observe the outdoors. Observe dawn or dusk or high noon. Observe the individual leaves on trees and shrubs. Observe the different types and shapes of trees. Observe the different greens of the leaves and grasses. Observe the shadows of the leaves and trees and how the color of the shadows really looks. Observe the turn of the petals on a flower. Observe the different blues in the sky at different times of day. Observe the different types and shapes of clouds and the color of the clouds. Observe the water in a creek or in the street and how it moves and reflects the light. Observe a distant hill and how the light changes the color.

Observe indoors. Observe the apple in the bowl—is it red all over? Observe the light as it streams in the windows and the different kinds of shadows it makes. Observe your perspective where the ceiling meets the wall. Observe the glass and how it curves and catches the light. Observe a stairway and all its angles. At the art museum, take time to observe the paintings up close for the technique and brushstrokes.

Observe life. Remember it’s in the details. Then use it to improve your drawing, painting, sculpting, and your life.

Cheers!